硬盘可以休眠了,大伙试试有没有BUG

11 五月, 2025


和群友聊天发现硬盘休眠有问题,hdparm搞不定,我找了个解决办法,但是可能出现BUG,各位可以试试!
此方法个人测试暂未发现问题,硬盘休眠,需要时自动启动都无问题;
问题:直接使用 hdparm -Y /dev/sda1,发现硬盘不能休眠,用手摸着硬盘执行命令,感觉到有磁头归位动作,但是马上又转起来了,分析原因可能是某个进程不停再检测或读取硬盘;
解决方法:fuser命令(如果找不到命令就安装psmisc),hdparm(如果找不到命令就安装hdparm)
1、执行fuser -c /mnt;(欢迎大佬指点,我分析不到具体原因,就直接强行解除了进程对挂载点的占用,也正因为这一点,可能存在bug)
2、测试下,输入hdparm -Y /dev/sda1(sda1为挂载硬盘的分区,自己查看选择),执行时用手按着硬盘,感觉下硬盘是否停止了转动,如果停止了那就有戏;
3、硬盘无访问情况下自动休眠,并随开机启动(如果挂了网心云等不间断读写硬盘应用是无法休眠的):
在/lib/systemd/system/rc-local.service文件最下方插入行:
[Install]
WantedBy=multi-user.target

然后vi /etc/rc.local输入
#!/bin/sh
hdparm -S 60 /dev/sda1
 (60为5分钟自动休眠,12的倍数,自己算需要的时间)

最后执行
chmod 777 /etc/rc.local
systemctl enable rc-local.service
然后reboot就OK

如果更换硬盘后休眠失效,需要再执行下步骤1


欢迎投稿(技术分享、原创教程)至本站机器人: blog#mige.eu.org
 

CM101s-2 hi3798mv100 搭建基于IPv6的Tailscale Derper中继服务器

30 四月, 2025

前置条件

  1. 设备能够获取到公网的IPv6地址
  2. 设备添加好DNS自动更新设置
  3. 申请好域名证书

资料前置

  1. 绑定域名 tailscale-guest.tr069-main.xyz
  2. 自动更新 DDNS
  3. 使用 acme.sh 申请 ssl 证书和自动续期

第一步

  1. 创建证书目录并授权
    mkdir /opt/tailscale/cert
    chmod 755 /opt/tailscale/cert

  2. 复制证书到指定目录
    mv /var/www/wwwroot/tailscale-guest.tr069-main.xyz/fullchain.cer /opt/tailscale/cert/tailscale-guest.tr069-main.xyz.crt
    mv /var/www/wwwroot/tailscale-guest.tr069-main.xyz/cert.key /opt/tailscale/cert/tailscale-guest.tr069-main.xyz.key

  3. 创建执行文件目录和启动脚本[留下邮箱提供 arm 架构的执行文件]
    mkdir -p /opt/tailscale/bin
    chmod 755 /opt/tailscale/bin

3.1 创建启动脚本[需要会使用 vi 命令]
vi /opt/tailscale/bin/runderper.sh

#!/bin/sh  cd /opt/tailscale/bin  nohup ./derper -hostname tailscale-guest.tr069-main.xyz -c=derper.conf -a :56473 -http-port -1 -certdir /opt/tailscale/cert -certmode manual -stun > console.log 2>&1 &  echo $! > app.pid

chmod +x /opt/tailscale/bin/runderper.sh
3.2 创建停止脚本
vi /opt/tailscale/bin/stopderper.sh

#!/bin/sh  kill `cat app.pid`  rm -rf app.pid

chmod +x /opt/tailscale/bin/stopderper.sh
3.3 创建服务文件方便管理
vi /etc/systemd/system/derper.service

Description=Derper Server  After=network.target     [Service]  Type=forking  ExecStart=/opt/tailscale/bin/runderper.sh  ExecStop=/opt/tailscale/bin/stopderper.sh     [Install]  WantedBy=Multi-user.target
  1. 启动服务并设为开机自动启动
    systemctl start derper
    systemctl enable derper

注意:如果节点不共享建议添加参数 -verify-clients 只认服务器上 tailscale 客户端登录的账号
nohup ./derper -hostname tailscale-guest.tr069-main.xyz -c=derper.conf -a :56473 -http-port -1 -certdir /opt/tailscale/cert -certmode manual -stun -verify-clients > console.log 2>&1 &

启动没问题以后就可以打开链接测试了
https://tailscale-guest.tr069-main.xyz:56473/

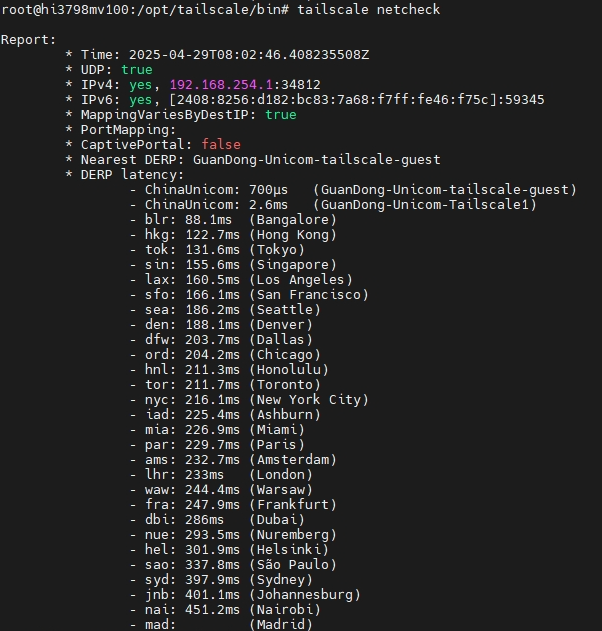
注意:下面的代码添加到你的tailscale 控制台即可使用,再加人的客户端中执行 tailscale netcheck 既可以看到你的Derper 节点信息

"902": {  				"RegionID":   902,  				"RegionCode": "ChinaUnicom",  				"RegionName": "GuanDong-Unicom-tailscale-guest",  				"Nodes": [  					{  						"Name":             "902",  						"RegionID":         902,  						"HostName":         "tailscale-guest.tr069-main.xyz",  						"DERPPort":         56473,  						"InsecureForTests": true,  					},  				],  			},


欢迎投稿(技术分享、原创教程)至本站机器人: blog#mige.eu.org
 

现在上班有个奇特现象:你能在一个公司工作12年以上,无论你态度多好,多么忠诚,一旦公司盈利不好,那么你就是“眼中钉,肉中刺”

16 四月, 2025


在职场上,老员工总是不受待见,

尤其是当公司效益不好的时候,老同事往往会成为背锅侠。

现在上班有一个奇怪的现象:如果你在一个公司里工作12年以上,无论你多忠诚,迟早是公司的"眼中钉,肉中刺"。

这个比喻一点也不夸张。

很多职场的中年人,正在遭遇被清退处理的厄运。

老员工,是公司的功臣,是伴随着公司发展壮大的。

公司能够有今天的成绩,也是很多老员工多年贡献出来的。

而现在公司的经营情况不好了,订单下降了,

甚至是盈利变成了亏损,当公司开始降本增效的时候,

就开始上演"卸磨杀驴"的经典戏码了。

不管多么忠诚的好员工,也不管曾经的贡献有多大,

年龄大了,就会成为公司的累赘。

一些老板,会认为是这么年龄大的员工拖累了公司的转型和发展。

这个时候,眼中钉,肉中刺的标签,就被牢牢打上了。

保姆级青龙面板忘记密码后找回

13 四月, 2025


首先登陆ssh后台
然后获取docker容器列表:
docker ps
找到列表里有ql、qinglong字眼的,列表最前面就是容器id

root@hi3798mv100:/# docker ps  CONTAINER ID   IMAGE             COMMAND                 CREATED         STATUS        PORTS        NAMES  **46f4202d9552**   registry...   "./docker/docker-ent…"   5 months ago   Up 9 days   0.0.0.0:5......         ql

然后进入容器ssh:
docker exec -it 你的容器ID"" /bin/sh
进去以后ls一下,看看有没有data这个文件夹

root@46f4202d9552:/ql $ ls  LICENSE       README.md  cli     **data**  docker  log           nodemon.json  pnpm-lock.yaml  raw   sample   shell  static              tsconfig.json  version.yaml  README-en.md  back       config  db    jbot    node_modules  package.json  public          repo  scripts  src    tsconfig.back.json  typings.d.ts

cd进去
cd data && ls
应该有个config文件夹,也是cd进去
cd config && ls
看到有个auth.json就vi进去:
vi auth.json
然后应该就能看到了


欢迎投稿(技术分享、原创教程)至本站机器人: blog#mige.eu.org
 

小白写了一个手机扫码配置网络的脚本

14 三月, 2025

这脚本是我用AI写的哈,本人完全不会写哈,只是分享出来大家一起学习。 [有能力的大佬可以完美的优化下。~~~~

怎么上传不了附件

下面是脚本文,保存*.sh 执行就可以了。

#!/bin/bash
确保以 root 用户运行脚本
if [ "$(id -u)" -ne 0 ]; then
echo "此脚本需要 root 权限,请以 root 用户运行。"
exit 1
fi
更新系统并安装必要的软件包
echo "正在更新系统并安装必要的软件包..."
apt-get update
apt-get install -y hostapd dnsmasq python3 python3-pip qrencode wget kmod
安装 Flask
pip3 install flask
配置无线网卡
echo "正在配置无线网卡..."
cat <<EOF > /etc/network/interfaces.d/wlan0
auto wlan0
iface wlan0 inet static
address 192.168.42.1
netmask 255.255.255.0
gateway 192.168.42.1
dns-nameservers 8.8.8.8
EOF
配置 hostapd
echo "正在配置 hostapd..."
cat <<EOF > /etc/hostapd/hostapd.conf
interface=wlan0
driver=nl80211
ssid=MyLinuxAP
hw_mode=g
channel=6
macaddr_acl=0
auth_algs=1
ignore_broadcast_ssid=0
wpa=2
wpa_passphrase=123456789
wpa_key_mgmt=WPA-PSK
wpa_pairwise=TKIP
rsn_pairwise=CCMP
EOF
配置 dnsmasq
echo "正在配置 dnsmasq..."
cat <<EOF > /etc/dnsmasq.conf
interface=wlan0
dhcp-range=192.168.42.2,192.168.42.20,255.255.255.0,24h
port=53
server=8.8.8.8
EOF
停止并禁用服务
echo "正在停止并禁用服务..."
systemctl stop hostapd
systemctl stop dnsmasq
systemctl disable hostapd
systemctl disable dnsmasq
取消屏蔽服务
echo "正在取消屏蔽服务..."
systemctl unmask hostapd
systemctl unmask dnsmasq
启动服务
echo "正在启动服务..."
systemctl enable hostapd
systemctl enable dnsmasq
systemctl restart hostapd
systemctl restart dnsmasq
创建 Flask 应用
echo "正在创建 Flask 应用..."
cat <<EOF > /usr/local/bin/app.py
from flask import Flask, request, jsonify, render_template_string
import subprocess
app = Flask(name)
@app.route('/')
def index():
return render_template_string('''
<h1>连接到 WiFi</h1>
<div id="wifi-list"></div>
<script>
fetch('/scan')
.then(response => response.json())
.then(data => {
const wifiList = document.getElementById('wifi-list');
data.forEach(wifi => {
const listItem = document.createElement('div');
listItem.textContent = `\${wifi.ssid} (\${wifi.signal} dBm)`;
listItem.onclick = () => {
const password = prompt(`Connecting to \${wifi.ssid}. Enter password:`);
fetch('/connect', {
method: 'POST',
headers: {'Content-Type': 'application/json'},
body: JSON.stringify({ssid: wifi.ssid, password: password})
}).then(response => response.json())
.then(data => alert(data.status === 'success' ? 'Connected!' : 'Failed: ' + data.message));
};
wifiList.appendChild(listItem);
});
});
</script>
''')
@app.route('/scan')
def scan_wifi():
result = subprocess.run(["nmcli", "-t", "-f", "IN-USE,SSID,SIGNAL,SECURITY", "dev", "wifi"], capture_output=True, text=True)
networks = result.stdout.strip().split('\n')
wifi_list = []
for network in networks:
if network.strip():
parts = network.split(':')
wifi_list.append({
'ssid': parts[1].strip(),
'signal': parts[2].strip(),
'security': parts[3].strip()
})
return jsonify(wifi_list)
@app.route('/connect', methods=['POST'])
def connect_wifi():
data = request.json
ssid = data.get('ssid')
password = data.get('password')
if ssid and password:
result = subprocess.run(
["nmcli", "dev", "wifi", "connect", ssid, "password", password],
capture_output=True, text=True
)
if result.returncode == 0:
return jsonify({"status": "success"})
else:
return jsonify({"status": "error", "message": result.stderr})
return jsonify({"status": "error", "message": "Invalid input"})
if name == 'main':
app.run(host='0.0.0.0', port=5001)
EOF
开放相关端口
echo "正在开放相关端口..."
ufw allow 53
ufw allow 5001
ufw allow 80
ufw allow 443
启动 Flask 应用
echo "正在启动 Flask 应用..."
python3 /usr/local/bin/app.py &
生成二维码
echo "正在生成二维码..."
qrencode -o /usr/local/bin/qr.png "http://192.168.42.1:5001"
echo "部署完成!"
echo "请扫描 /usr/local/bin/qr.png 中的二维码以配置 WiFi。"


欢迎投稿(技术分享、原创教程)至本站机器人: blog#mige.eu.org